Tuesday, December 28, 2010

Candy Ornaments

I picked up this cute little candy pick at JoAnns a few weeks ago at a lovely 60% off, making it .39.   My kinda price!  So, I bought 2.  I thought they were cute but I didnt want to use them the way they were.  I wanted to do something different with them.


I wanted them to be individual candy ornaments for my little white tree in my kitchen.  I like to put all things sweet on the kitchen tree(cupcakes, candy, etc.)so I thought these would make cute ornaments.  I just cut them apart with wire cutters.  Or you can gently wiggle the wires out of the candies.  And that leaves the perfect little hole to put a lollipop stick in.  Wrap them up in cellophane, add a ribbon and your done.  Too sweet.  The larger candy on the top is just wrapped in cellophane, sans stick.  I thought it looked better that way.  But there are no rules here.  Stick it, if you want to.  I wont judge.


They looked pretty cute on the tree and you just cant beat the price.  They would make cute little present toppers, too. 


I bought 2 sets of the picks so I wanted to do something different with the second set.  So, I coated them with Mod Podge and then rolled them in Epsom Salt.  It gave them such a pretty, sugared look. 
Wrap them or leave them naked.  They are beautiful, either way.  And the grand total is .13 each.  Sweet.  

Tuesday, December 21, 2010

Do you ever do this?

I was at JoAnns recently and found a great craft punch at a great price.  It was a 1.5 inch circle punch for $6.  But, the last thing I need to do right now is spend money on something that Im only going to use once or twice and then throw  in my craft drawer, never to be seen again.  If I was to buy this craft punch, I would need to come up with at least 2 or 3 things that I could do with it in order to justify the purchase.  Crafty Rule #1-NO UNITASKERS!  Everything worth owning in the Craft World needs to have more than one use.  So, I bought it.  And then came up with a few things to do with it.


I punched out 1 tissue paper circle and 1 card stock circle.  Actually, in an effort to save my card stock, I used a cardboard tube from the center of a roll of wrapping paper and just flattened it.  Then I glued them together and used a small hole punch to put a tiny hole in the top.  Then I added a ribbon.  Instant gift tag.


I got out a few christmas gift bags from last year and did the same thing.  Punched 1 decorative circle and 1 card stock circle.  If your card stock deficient, and you dont have any empty wrapping paper rolls laying around, you can use a cereal box.  Or any thin cardboard type box you have laying around.  Macaroni and cheese, band aids, whatever  You just need a circle for the back that is a plain color so you can write to and from and to add a little more heft to your tag.  You dont have to use the second circle but it does make it more sturdy.


You can even add some stickers or little jems if you want.  Glitter is always nice, too.


You can also fold a piece of paper in half and punch it with some of the fold in the punch and you get a cute little gift card.


You can use the tags as a wine glass marker, too.  Oh, darn.  Now I have this glass of wine here.  I only poured it to use as an example for the picture but now I guess I have to drink it.  Oh the things I will do for the blog!

So, now that my 1 glass of wine has turned into 2, Im sure the rest of this post will be interesting. 


They look pretty cute around a bottle of wine..  Or maybe I just have my wine goggles on. 


They even look cute on the tree as a simple little ornament.  You could also make a garland out of the circles by gluing them on a string or ribbon. 

So, Im pretty sure my mission was a success.  I found more than 1 use for this great little addition to my craft drawer.  AND I had a nice glass (or 2) of wine.  What a great day.

Thursday, December 16, 2010

Vote For Me

This is one of my entries for The Dollar Tree Holiday Craft Contest. Voting starts tonight at midnight eastern time. You can vote once a day through the 28th. Wish me luck!


$5 Wreath

The Dollar Tree Holiday Craft Contest

This is one of my entries for The Dollar Store Holiday Craft Contest. Voting starts tonight at midnight eastern time and you can vote for your favorite entry once a day. I would love it if you could take time out of your busy day to vote for me. Thanks, and wish me luck!


A Berry Easy Tree

Wednesday, December 15, 2010

Gingerbread Village

I was at Target yesterday, in the dollar section, and I found this....


Its one of those photo cubes that Im sure you have seen before.  I wanted to make something cute with it but wasnt quite sure what to do.  The dollar section didnt offer much inspiration so I headed to Michaels to see what I could come up with. 


And here it is.......


I want to live here....or at least visit for a while.

I simply opened the frame and cut a piece of the inside wrapper, since it was already the perfect size to fit in the frame, and hot glued some stickers and embellishments to the paper.  I just put a glob of glue down where I wanted the stickers and held them upright until they stayed. 


The gingerbread people, house and gumdrops were part of a foam sticker set that I got at Michaels for $1.49.  The tree and bushes were a holiday pick that was .49.  And the present came out of a pack of 10 for $1.49.   Im not sure if you can tell from the picture but I also used regular school glue on the rest of the ground and sprinkled epsom salt to look like snow.  Then I carefully put the frame back together. 

I just love the way this turned out.  My 2 year old daughter stares at it and tells me what she thinks they are saying and Im feeling kinda proud because Im pretty sure I just created a warm and magical Christmas memory for her, and for myself, for less than $5. 

Then she looks at me and says, "Lets eat 'em!"

Ah, yes...warm and magical.


Thursday, December 9, 2010

Almost Free Candle Holders

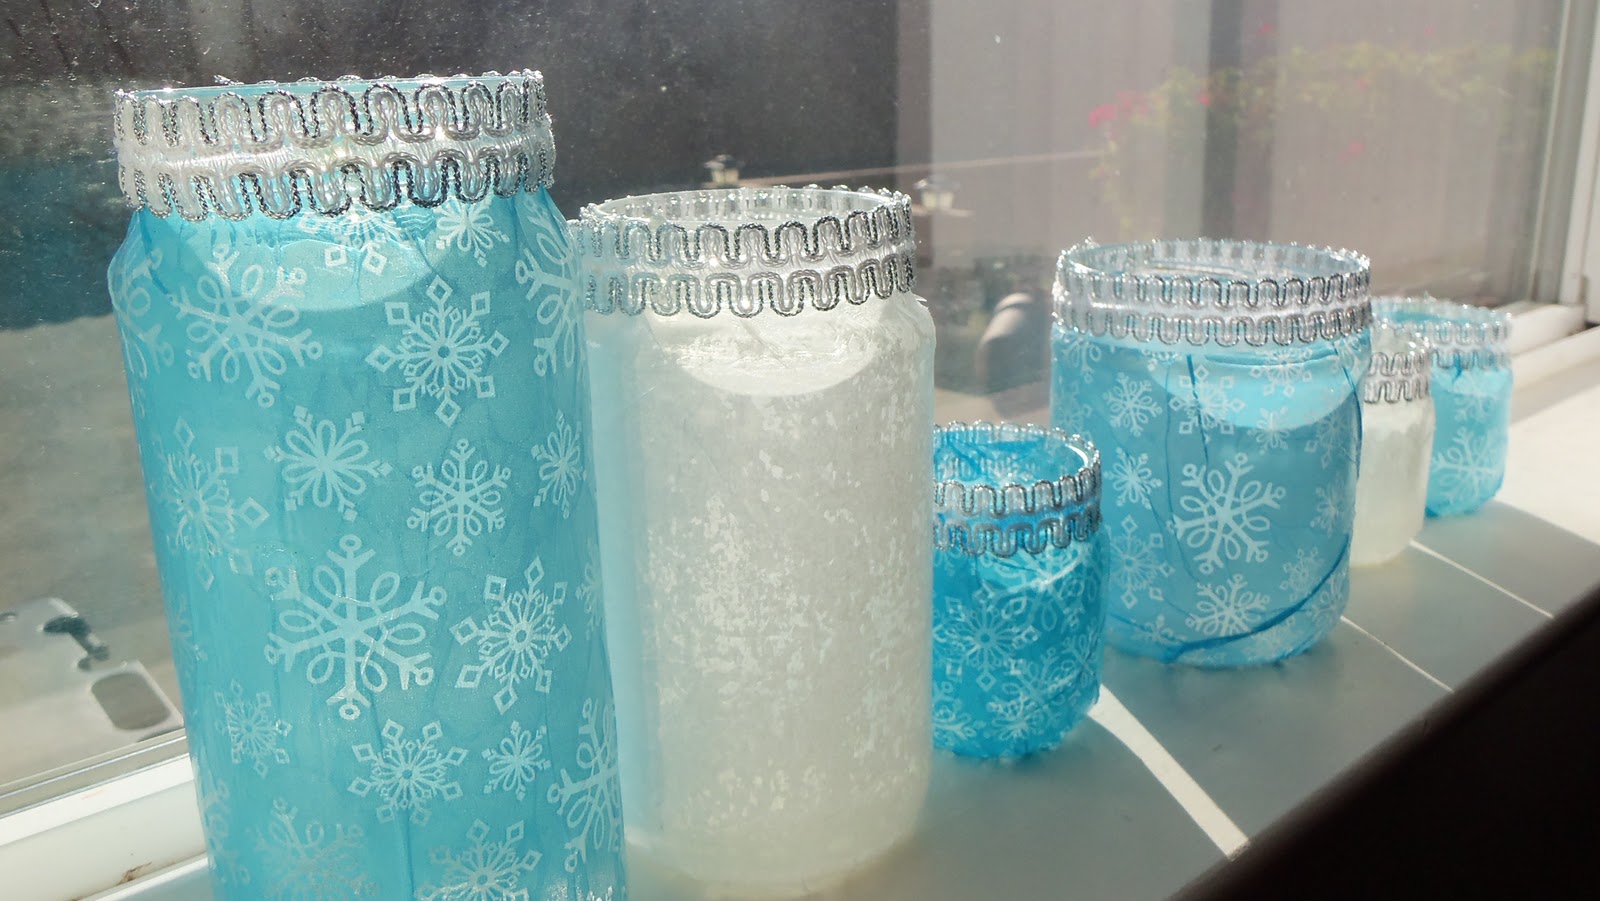
Im starting to see a pattern here.  I do a lot of crafts with stuff that is fairly inexpensive.  These candle holders are almost free.  I say almost because you use empty glass jars from food that you already buy and tissue paper which you can get at the dollar store or recycle from a gift you have received.  If you are a pack rat, like I am, then you should have plenty of tissue paper in little folded piles all over your house. 


The idea for these came from Halloween.  Lots of different versions of ghosts and monsters were created using this method.  I just so happened to have a lot of empty baby food jars and pasta sauce jars shortly after Halloween so I thought I would use them up.

This is the first version I made.  Lets call this the Fall Collection, shall we? 


I just noticed something.  Its not much of a collection if it is just one, now is it?  Moving on....


I just took the empty jar, smeared the whole thing with Mod Podge and wrapped the tissue paper around it.  Another layer of  Mod Podge on top of the tissue and stuck some fake leaves on it.  Then I wrapped the top with yarn.  If you dont have Mod Podge, you can also water down regular school glue and use that. 


The picture really doesnt show its true beauty.  It looks so pretty when you put the candle in.  Gives off a very soft, warm glow.  And the baby food jars are the perfect size for a little tea light candle. 


I just loved the way they looked so I had to make more for Christmas..


Same idea here...clean glass jar, smear with goo, wrap with tissue...but here I splurged and bought a spool of ribbon for a buck at the craft store....It is Christmas, after all. 


You can make a few of these and they look really nice but since they are so cheap and easy to make, you could also make a bunch of them for real impact.  I am making about 25 for my large family room window and I cant wait to see how it looks..  Im thinking they would also look nice outside to light a walkway.